|
|
|
|
Volkswagen Electrical
| Electrical
|
As far as autos go, the aircooled VWs have a very simple electrical system. There isn't much that can go wrong, and when they do, they are generally easy to isolate and fix. Problems generally arise from electrical "upgrades" and repairs from a previous owner or mechanic.
Fuel Gage
The original VW fuel gage uses a thermal resistor to give you a fuel level reading. For this to work and provide an accurate reading, the thermal coil needs to be operational and you need to have the voltage properly regulated.
Fuses
Fuses are important in that they protect your fuses and can prevent an electrical fire should something short.
The VW fuse configurations differ from year to year. Yours may be found at The Samba.
For 1973 and on standard Type 1 Beetles:
| Number
L to R |
Amps | Function |
| 1 | 8 | Left taillight Left front turn/parking light Left side marker light License plate light |
| 2 | 8 | Right taillight Right side marker light Right front turn/park light |
| 3 | 8 | Left low beam |
| 4 | 8 | Right low beam |
| 5 | 8 | Left high beam High beam indicator |
| 6 | 8 | Right high beam |
| 7 | 8 | Unassigned |
| 8 | 8 | Emergency Flasher |
| 9 | 16 | Interior light |
| 10 | 16 | Rear window fogger relay Fresh Air Fan Windshield wipers |
| 11 | 8 | Horn Brake lights Control valve (Auto Stick) |
| 12 | 8 | Seat belt interlock Instrument lights Fuel gauge Turn signals |
A nice trick is to paint a red and/or white dot over each appropriate fuse connection. This will make it much easier to replace each fuse with the proper sized fuse when you nock out several or after you place the wrong size fuse during a road trip and don't remember which fuse needs to be corrected.
Bosch Type Fuses (aka bullet, torpedo and ATS type fuses)
These are what came with your VW. The VW autos use an old European fuse design and many auto parts stores do not carry these in their inventory. If you don't plan on upgrading and updating the entire electrical system with a more modern auto fuse system, then you should store a few spare fuses in your glove box.
ATS Fuse
| Color | Amperes | |
|---|---|---|
| yellow | 5 | |
| white | 8 | |
| red (or green) | 16 | |
| blue | 25 | |
| grey | 40 | |
Blade Type Fuses (ATO / ATC / APR)
These are easier to find these days and are much less prone to problems that the old bullet type fuses.

If you are rewiring everything and don't care about keeping things "stock", fuse panels such as the one shown above may make wiring easier, safer and ease future maintenance. These can be found at Wrangler NW.
| Color | Current (A) | |
|---|---|---|
| black* | 1 | |
| grey | 2 | |
| violet | 3 | |
| pink | 4 | |
| orange/tan | 5 | |
| brown | 7.5 | |
| red | 10 | |
| aqua/blue | 15 | |
| yellow | 20 | |
| clear/natural | 25 | |
| green | 30 | |
| blue green* | 35 | |
| amber* | 40 | |
* not available in Mini Fuses
Circuit Breakers
These are available in many different configurations and many can fit right into the blade type fuse holders. These can either be reset manually or are auto reset depending on design.
Intermittent Wiper Controller
If you live where it rains a lot, this can be a very utilitarian upgrade for a daily driver and well worth your time, effort and money.
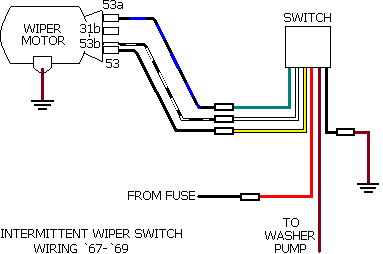

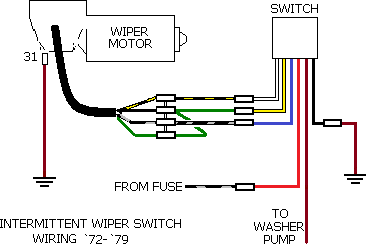
Intermittent Wiper Switch Install - Cole Hersee part number 75600-04
Relays
Relays are basically electrical switches that allow most the the electrical current from the battery to be available to the device it is connected to. It also requires very minute amounts of electrical current to "flip the switch". These are often used to power headlights, auxiliary lights and other high amperage devices. When you use a relay for a headlight, the light will be much brighter than if the electrical current had to travel through the ignition switch and headlight switch. This also significantly decreases the current traveling through the passenger compartment and decreases the potential of an electrical fire overall.
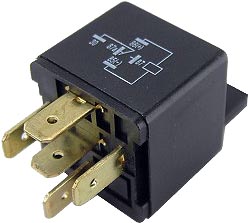
Bosch Style Auto Relay
You shoulder ideally use a relay anytime you hook up a "high" amperage device.
The Bosch type 12V auto relay comes in generally 2 different flavors.
Single Pole Single Throw (SPST)
A 30 amp 12V SPST auto relay is commonly used to power on accessory lights and other accessories. It has two power out terminals that are both switched on when the relay is activated. This allows you to easily wire twin separate lights to one relay without having to wire them together. The are also available in 40 amp and greater versions.
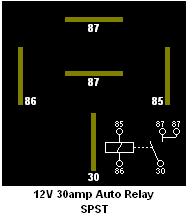
Terminals
| 30 | Power in - generally wired straight from the battery |
| 85 | Negative side of relay coil. This grounds the relay switch. |
| 86 | Positive side of relay coil. This switches on the relay. Note that 85 and 86 can generally by reversed. |
| 87 | Power out. When the relay is activated, power from 30 is connected to this terminal |
| 87 | Power out. This allows for wiring of a second device with a separate wire. |
Single Pole Dual Throw (SPDT)
A 30 amp 12V SPDT auto relay is commonly used to power a single accessory or allow you to turn an item off that is generally on. It has two power out terminals, but unlike the SPST which has to 87 terminals, the SPDT has an 87 and and 87a terminal. The 87a terminal is closed (powered on) when the relay is not activated and the 87 terminal is open (off) when the relay is not activated. When you activate the relay, 87's circuit closes and powers on, while circuit 87a opens and powers off. These are also available in 40 amp and above.
Of note, the 87a circuit may have a lower amperage rating than the 87 circuit. Example - some 40 amp relays state that the 87 circuit can handle up to 40 amps and the 87a circuit can handle up to 30 amps.
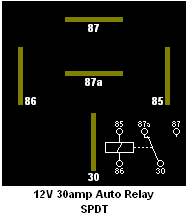
Terminals
| 30 | Power in - generally wired straight from the battery |
| 85 | Negative side of relay coil. This grounds the relay switch. |
| 86 | Positive side of relay coil. This switches on the relay. Note that 85 and 86 can generally by reversed. |
| 87 | Power out - default off. When the relay is activated, power from 30 is connected to this terminal |
| 87a | Power out - default off. When the relay is NOT activated, power from 30 is connected to this terminal. When the relay is activated, the circuit to 30 is disconnected. |
Relay Socket
A 5 pin relay socket makes a good compliment to a Bosch style auto relay.
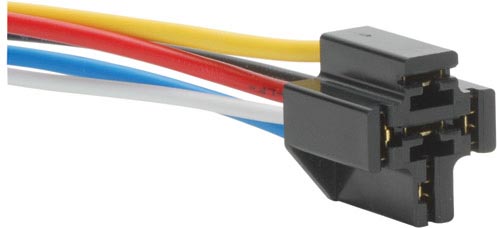
5 Pin Relay Socket
This will allow for a cleaner installation that is less prone to wiring problems that some times arise when one of your terminal connectors comes loose. It makes switching out relays much easier and you can more easily solder and insulate (heat shrink) your wiring.
High Amp Relays
There are many automotive auto relays that will allow you to switch high amp accessories, even beyond the loads than your alternator or generator could ever handle - such as winches.
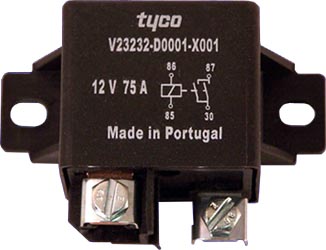
Bosch (now Tyco) 75 Amp Maxi Relay
For wiring a VW, these can come in handy, as you can run a wire from your battery to a high amp relay that switches on only when the key is inserted in the ignition switch (see below). You can then run wire(s) to a fuse box that feeds your radio, lights, and other accessories. This would allow for the possibility of cleaner and safer wiring without the voltage drop associated with the stock VW wiring layout. Plus everything would turn off when you remove the key from the ignition.
Ref Part Numbers:
UPC 663283919003
SKU: BR-5000
Wire Gauge
The greater the electrical current and the greater the length of the wire in questions, the greater the diameter of the wire you should use. If you use a wire that is too thin for the maximum current traveling through it, the wire will heat up, which in turn increases its overall resistance, which in turn will cause a jump in wire temperature. This can lead to insufficient amounts of current to run the device you are powering, decreased performance (dim lights), a blown fuse or even an electrical fire.
When in question, a larger diameter wire is always better.
|
Amps Calculator
Note: A good working generator or alternator should put out over 14 volts, but using 12 volts in the calculator above gives you a small safety margin and gives you a more accurate true load estimate when you are running on battery alone. |
Amps @ 12 Volts |
Wire Gauge |
|||||||||||||||
| 3' | 5' | 7' | 10' | 15' | 20' | 25' | |||||||||||
| 0 to 1 | 18 | 18 | 18 | 18 | 18 | 18 | 18 | ||||||||||
| 1.5 | 18 | 18 | 18 | 18 | 18 | 18 | 18 | ||||||||||
| 2 | 18 | 18 | 18 | 18 | 18 | 18 | 18 | ||||||||||
| 3 | 18 | 18 | 18 | 18 | 18 | 18 | 18 | ||||||||||
| 4 | 18 | 18 | 18 | 18 | 18 | 18 | 18 | ||||||||||
| 5 | 18 | 18 | 18 | 18 | 18 | 18 | 18 | ||||||||||
| 6 | 18 | 18 | 18 | 18 | 18 | 18 | 16 | ||||||||||
| 7 | 18 | 18 | 18 | 18 | 18 | 18 | 16 | ||||||||||
| 8 | 18 | 18 | 18 | 18 | 18 | 16 | 16 | ||||||||||
| 10 | 18 | 18 | 18 | 18 | 16 | 16 | 14 | ||||||||||
| 11 | 18 | 18 | 18 | 18 | 16 | 16 | 14 | ||||||||||
| 12 | 18 | 18 | 18 | 18 | 16 | 16 | 14 | ||||||||||
| 15 | 18 | 18 | 18 | 18 | 14 | 14 | 12 | ||||||||||
| 18 | 18 | 18 | 16 | 16 | 14 | 14 | 12 | ||||||||||
| 20 | 18 | 18 | 16 | 16 | 14 | 12 | 10 | ||||||||||
| 22 | 18 | 18 | 16 | 14 | 12 | 12 | 10 | ||||||||||
| 24 | 18 | 18 | 16 | 14 | 12 | 12 | 10 | ||||||||||
| 30 | 18 | 16 | 14 | 12 | 10 | 10 | 10 | ||||||||||
| 36 | 16 | 14 | 14 | 12 | 10 | 10 | 10 | ||||||||||
| 40 | 16 | 14 | 12 | 12 | 10 | 10 | 8 | ||||||||||
| 50 | 16 | 14 | 12 | 10 | 10 | 10 | 8 | ||||||||||
| 100 | 12 | 12 | 10 | 10 | 6 | 6 | 4 | ||||||||||
| 150 | 10 | 10 | 8 | 8 | 4 | 4 | 2 | ||||||||||
| 200 | 10 | 8 | 8 | 6 | 4 | 4 | 2 | ||||||||||
Common Automotive Items and Recommended Wire Gauge
| Item | Ga | Item | Ga | |
| Air Conditioner | 16 | Horn to Relay | 12 | |
| Back Up Lights | 18 | Instrument Lights | 18 | |
| Battery to Switch | 12 | License Light | 18 | |
| Coil Low Side | 16 | Light Switch to Fuse | 14 | |
| Defroster | 16 | Parking Brake Release | 18 | |
| Directional Signals | 16 | Parking Lights | 18 | |
| Dome Light | 18 | Power Seats | 16 | |
| Electric Clock | 18 | Power Windows | 18 | |
| Electric Wipers | 18 | Radio to Fuse | 16 | |
| Gas Gauge to Coil | 16 | Relay to Dome Light | 18 | |
| Gas Gauge to Tank | 18 | Relay to Instrument Switch | 18 | |
| Generator to Ammeter | 12 | Stop Light Circuit | 18 | |
| Generator to Relay | 16 | Spot Light Circuit | 18 | |
| Head lights | 16 | Tail Light Circuit | 18 | |
| Head Light Relay | 16 | Trunk Light | 18 | |
| Heater | 18 | Window Locks | 18 | |
| Horn Circuit | 16 |
American Wire Gauge vs Metric Size
| American Wire Gauge (AWG) |
Diameter (inches) |
Diameter (mm) |
Cross Sectional Area (mm2) |
| 0000 | 0.46 | 11.68 | 107.16 |
| 000 | 0.4096 | 10.40 | 84.97 |
| 00 | 0.3648 | 9.27 | 67.40 |
| 0 | 0.3249 | 8.25 | 53.46 |
| 1 | 0.2893 | 7.35 | 42.39 |
| 2 | 0.2576 | 6.54 | 33.61 |
| 3 | 0.2294 | 5.83 | 26.65 |
| 4 | 0.2043 | 5.19 | 21.14 |
| 5 | 0.1819 | 4.62 | 16.76 |
| 6 | 0.162 | 4.11 | 13.29 |
| 7 | 0.1443 | 3.67 | 10.55 |
| 8 | 0.1285 | 3.26 | 8.36 |
| 9 | 0.1144 | 2.91 | 6.63 |
| 10 | 0.1019 | 2.59 | 5.26 |
| 11 | 0.0907 | 2.30 | 4.17 |
| 12 | 0.0808 | 2.05 | 3.31 |
| 13 | 0.072 | 1.83 | 2.63 |
| 14 | 0.0641 | 1.63 | 2.08 |
| 15 | 0.0571 | 1.45 | 1.65 |
| 16 | 0.0508 | 1.29 | 1.31 |
| 17 | 0.0453 | 1.15 | 1.04 |
| 18 | 0.0403 | 1.02 | 0.82 |
| 19 | 0.0359 | 0.91 | 0.65 |
| 20 | 0.032 | 0.81 | 0.52 |
| 21 | 0.0285 | 0.72 | 0.41 |
| 22 | 0.0254 | 0.65 | 0.33 |
| 23 | 0.0226 | 0.57 | 0.26 |
| 24 | 0.0201 | 0.51 | 0.20 |
| 25 | 0.0179 | 0.45 | 0.16 |
| 26 | 0.0159 | 0.40 | 0.13 |
Wiring Diagrams
If you have a 1973 or newer VW standard Beetle without fuel injection, you are in luck. You can use the fancy colored diagram here.
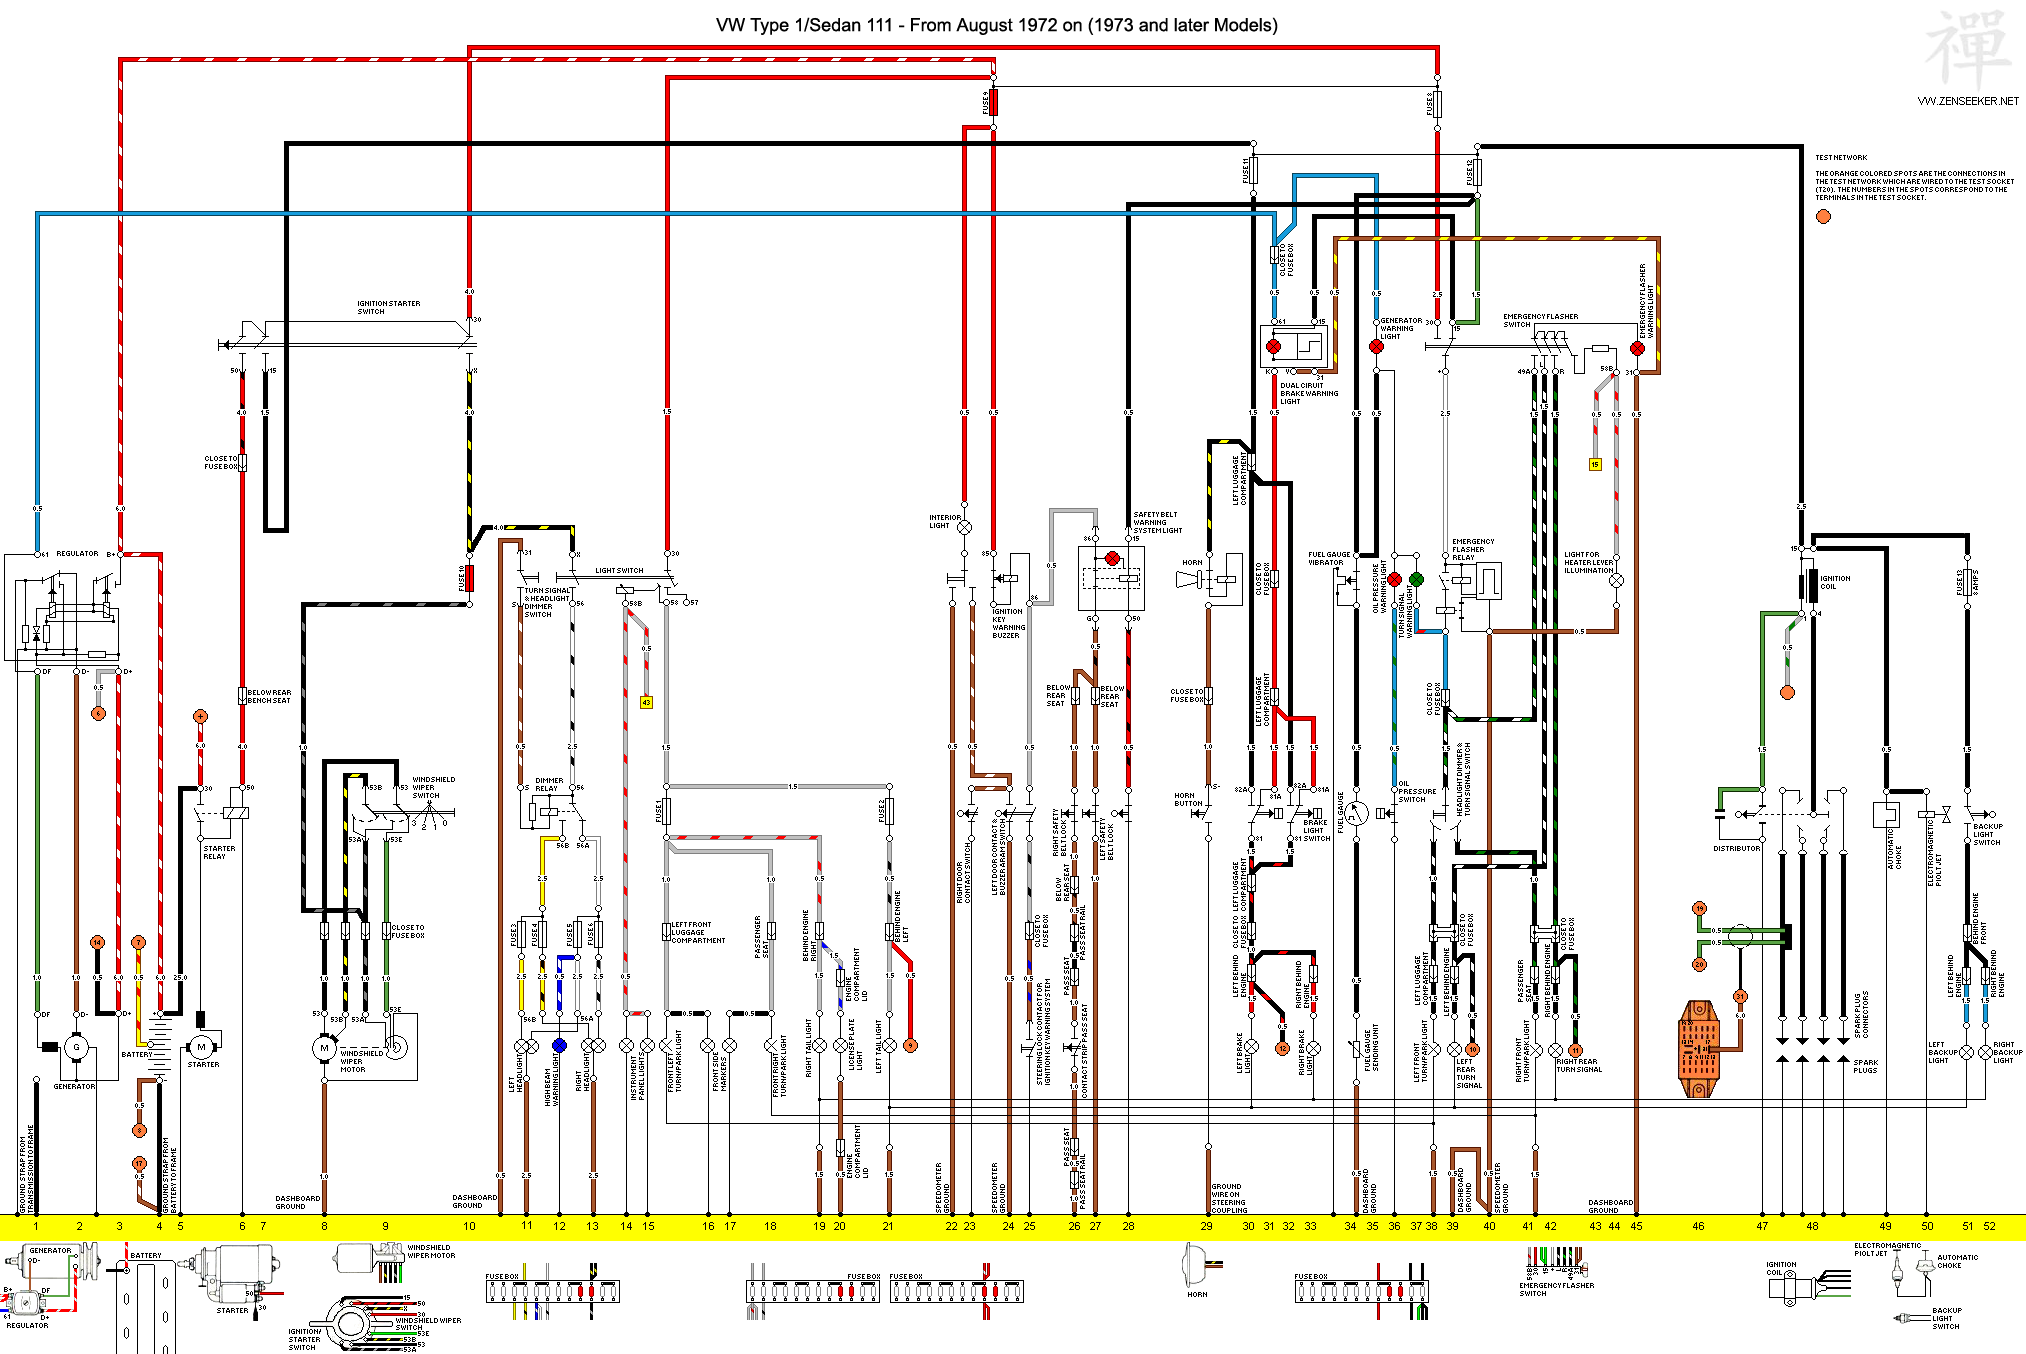
If you have another aircooled VW, then you can find a wiring diagram at The Samba, but do note that there are some errors on these diagrams that that your VW may no longer be wired as it was when if left the VW factory. Other schematics can be found at Speedy Jim's.
Alternators and Generators
This is covered in our Alternator Page.
Radio and other Key-In-Accessory-On Luxuries
There are several choices for radios that will fit in the factory spot without need for hacking away at the dash.
It is important to note that if you wire your radio so that it turns on when you turn your key to run that you shouldn't play your radio when your engine isn't running. If you do and your cap and rotor in your distributor is lined up, you can burn out your coil. To avoid this problem, you can wire your radio to a hot wire and remember to turn it off before the battery dies, not play your radio when the engine isn't running, setup some fancy timer or other gizmo or wire your radio so that it has power when the key is in the ignition.
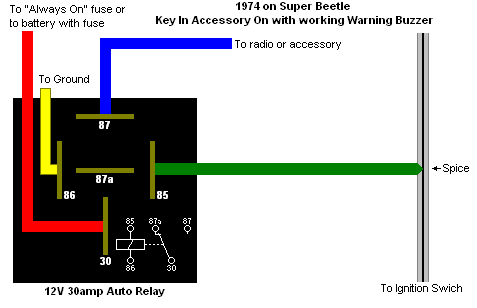
Stereo and Accessory Wiring 1969 and later VW Beetle and Super Beetle
This technique allows accessories to power on when the key is inserted and stay on until key is removed. Plus a headlight warning buzzer can be substituted for the key-in buzzer very easily. You will need a 12v automotive relay, some wire and and way to connect everything. A working voltmeter will make life easier.
For 1969 and on Standard Beetles and pre 1974 Super Beetles:
Locate the T1 connector (joins one wire to one wire) near the fuse panel (between speedometer and back of fuse panel) that joins a gray/black wire to the brown/blue (or possibly brown/green) wire to the door switch. If you can not locate this connection (wires are jacked or spray painted), you can look at the back of your ignition switch and find the small brown/blue or gray/black wire and trace it through the under dash sheet metal to the connector. This is connected to the SU terminal on the ignition switch.
Disconnect the wires and reconnect the wire coming from the ignition switch (brown/blue in mine possibly gray/black in others) to terminal 86 on your relay. This will disable your "key in" buzzer function. If you would like to keep the key in buzzer feature, you will need leave the gray/black and brown/blue wires connected and splice into it (you may need to use a diode to isolate the buzzer ground).
Connect the 30 and 85 terminals to an "always on" fuse or use a wire from the battery with an inline fuse.
Connect terminal 87 to your accessories
Terminal 87a is not used
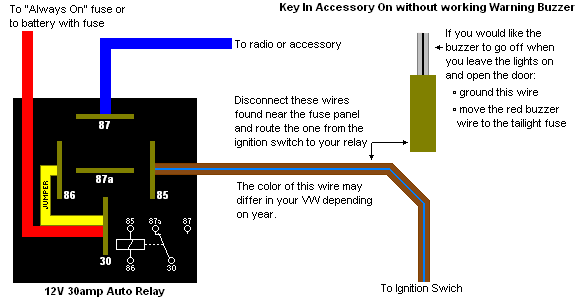
OR
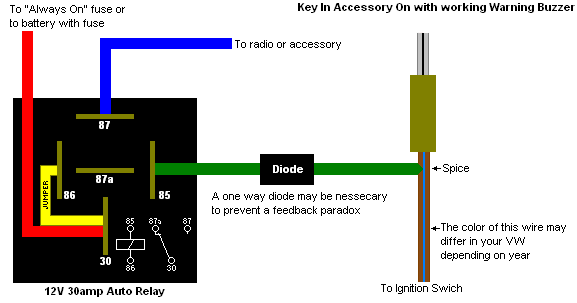
You can also connect a dash voltmeter to the relay so that you can monitor your battery while using your accessories.
If you find that the wire going to the ignition switch isn't grounding when you place your key in the ignition, you may need to check and repair/replace/install a new coupling ground. This can be done by running a wire between two adjacent bolts on the coupling or between the sleeve bolts on both sides of the coupling. This may also be why your horn isn't working.
For an optional headlight warning buzzer when you open the door
Ground the remaining wire from the T1 connector (brown/green or gray/black) that goes to the buzzer.
Unplug the buzzer wire (red) form it's fuse and plug it into the tail light fuse (not the headlight fuse)
Or - you could just rewire the two power wires (X-black/yellow and 30-red) that go to your light switch through a relay so that they can only power your lights with the key in (the black and yellow should already be hooked up to the ignition switch in 71 and later VWs). This will disable your park light function with the key out, but the park lights are rarely used as park lights outside of Europe.
Or - if you decide to rewire your lights, run separate relays for your low and high beam with power straight from the battery. Use the key in ground to ground the relay and power for the VW high and low circuit. This will direct more electricity to your lights and make them significantly brighter without the voltage drop from the ignition switch and it will all turn off when you remove the key from the ignition switch.
Note that on my 1973 Standard Beetle, there is a brown/blue wire coming out of the ignition switch that works perfectly as a Key-In ground. It is connected to a gray/black wire, which is opposite from what the VW wiring diagrams show.
Also of note, the gray/black wire coming for the ignition switch on 1974 and later Super Beetles have a hot (+) and not a ground. This allows you to power a small radio or accessory with it. If you have a higher amp stereo and high wattage accessory, you can use this hot wire to turn on a relay that feeds to your accessory. Make note that this is on Super Beetles and not Standard Beetles.
1974 and Later Super Beetles have a hot Key In gray/black wire coming out of the ignitions switch.
ref:
The Samba Car off, listening to the radio ... points?
Creating accessory key position for stereo/ headlight buzzer
For those with an in dash ignition switch, you can replace it with a more modern switch (universal or other vehicle) that has an accessory on option. You can also find one at Street Works that should fit without issue.
Headlight Wiring
In 1971 and later VWs sold in the US, the headlights should we wired through the X terminal in the ignition switch and should turn off when you turn the engine off. You should be able to run your park lights with the key out of the ignition, which is one way to kill your battery for the forgetful or those used to driving new cars that turn their own lights off after you walk away. If you are forgetful, you can rewire your parking lights so that they turn off when you remove the key from the ignition or so they only turn on with the key turned to "run". If you have an earlier VW, you will also need to rewire your headlights so that they only come on with either the engine on or the key in (see above).
You can also wire your park lights into your buzzer so that it buzzes when you open your door should you leave the lights on. (See above.)
Any good rewire of the headlights should incorporate relays to run "clean" electricity straight from the battery to the lights.
Turn Signal Relay
If you don't like the original VW setup and want to wire your brake and turn lights together, you can replace it with a relay pack that won't overload your switches and wires while providing full juice to your lights. Some DIY examples for a DR 650 motorcycle can be found on our DR 650 Signal Light Page. You can also just purchase a kit from Street Works.
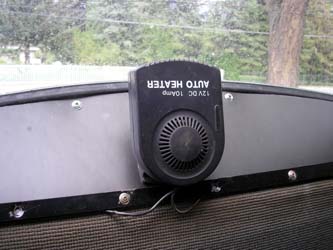
Defroster
If you don't have a working stock heater and defroster for any reason, you will give great thought to a window defroster anytime you drive in sub freezing temperatures. Options are numerous. You can hook up a space heater to your auto and preheat it prior to driving it. This can be done with an extension cord and a timer. You and use a auto or household hair drier or use one of the many commercial universal electric auto heaters and defrosters. If you want the most out of an high wattage 12v accessory, you will want to hard wire the device (with fuse) directly to your battery. Much juice is lost through the maze of electrical wires and connection if you are using a 12V power port.
Ref:
Ignition
This is covered in our Ignition Page.
Lighting
This is covered in our Lighting Page.
Other
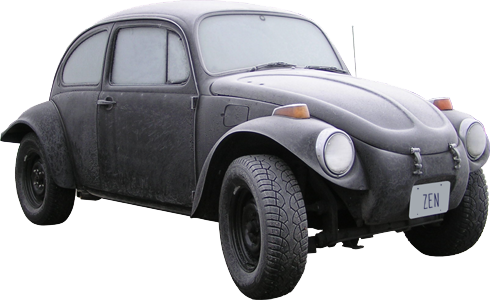
Example of fuses and relays in Baja - and a Subaru Engine
1972 VW Super Beetle Fresh Air Box
Wrangler NW - 100 Amp Alternators, Auto Wires, Circuit Breakers and More!
Please feel free to link to this site so that others can find it. It's easy to link to this site, just copy one of the texts below onto your web page:
Copyright © 2000-2010
